
Tutorial Video (0:00-0:15)
Watch on YouTube here.
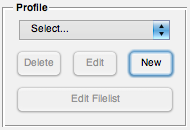
Your first step in FeatureFinder will be to setup a profile, which will help you access your files quickly and easily. The steps described below are presented in the tutorial video between 0:00 and 0:15.
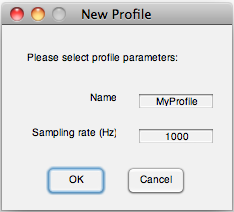
- To create your profile, select New in the “Profile” panel, which you can find in the top-left corner of the FeatureFinder window.
- Here, you can specify the name of your profile and the sampling rate of your data.
- The profile name and sampling rate can be changed at any time using the Edit button in the “Profile” panel. A profile can be deleted by selecting it in the “Profile” menu and then clicking the Delete button.
TIP: After you’ve setup your profile, you can easily create a “clone” of it by a) selecting it from the menu in the “Profile” panel, and then b) clicking “–> Clone this profile!” from the same menu. The cloned profile will include everything that was in the original (e.g., data files, filter settings, feature settings)—very handy for experimenting with different analysis methods!
| << Running FeatureFinder | Using the “File Management” tool >> |